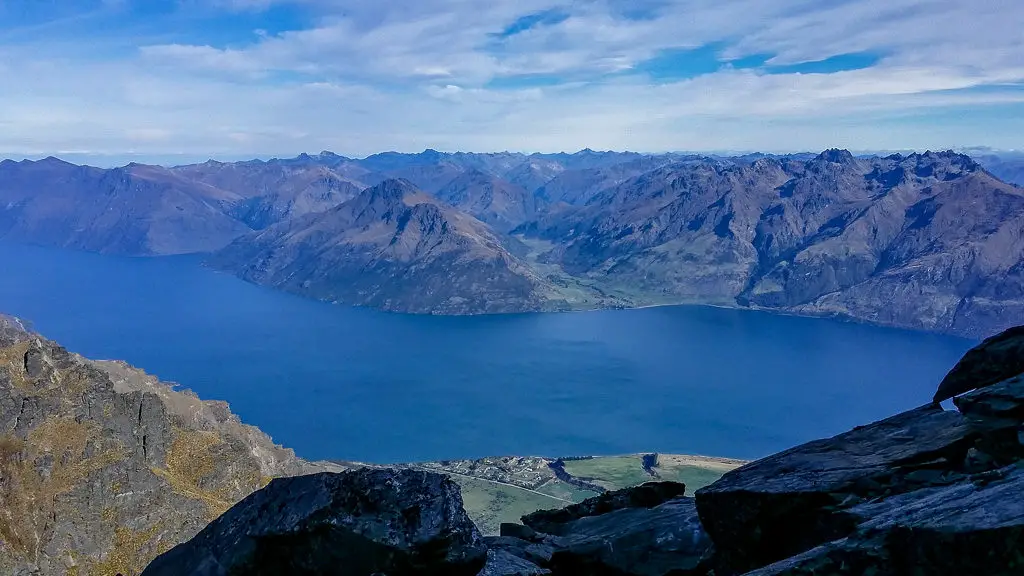
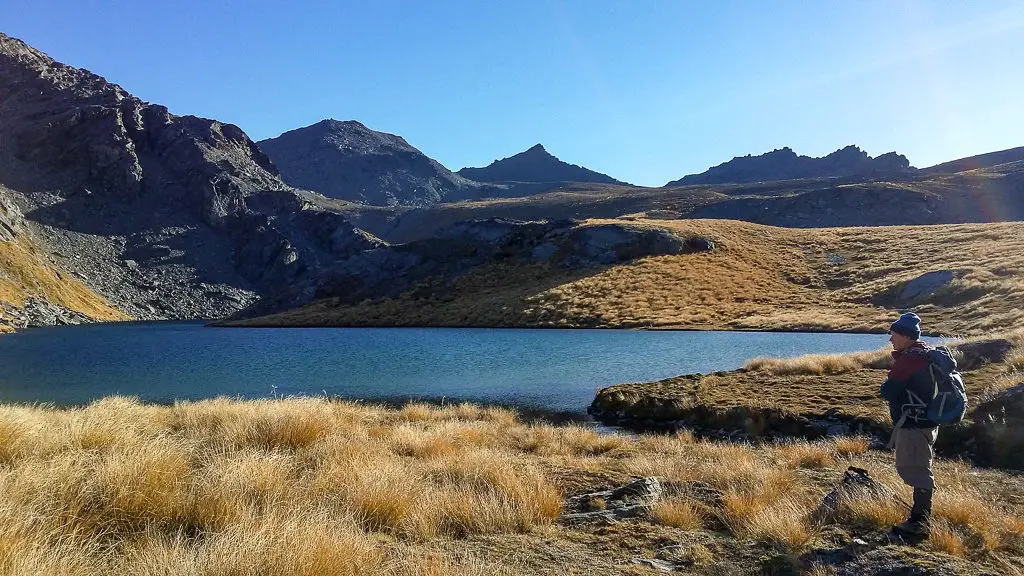
Lake Alta is a picturesque alpine lake perched in the Remarkables range. The lake is easily accessible. You drive up the ski field access road (upper part unsealed) for most of the climb. Then it’s an easy (but uphill) walk in. From Lake Alta there are many areas in the Remarkables to explore with amazing views over Queenstown, Wye Creek basin and Lake Wakitipu.
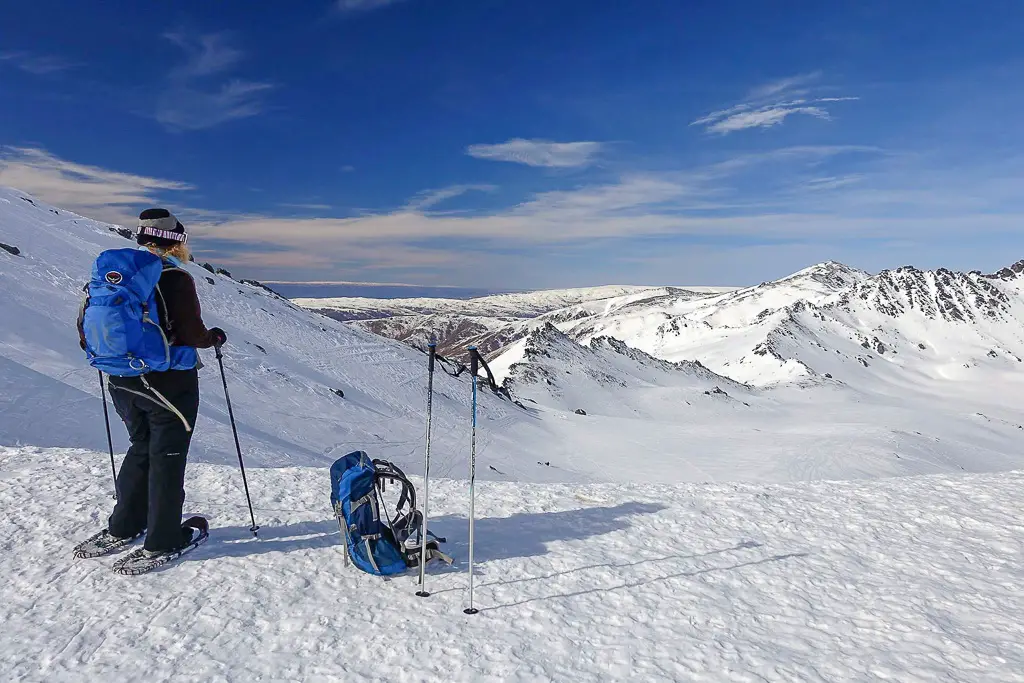
– These are summer only walks; in winter the lake is frozen, covered with snow and part of an active ski field. You’ll need shoes and relevant experience. –
Length: approx. 2km one-way to the lake with a climb of about 200m
Time taken: 2 hr return from the ski field carpark, with time to rest at the lake.
Difficulty: Easy
Facilities: Toilet at the carpark. Low rock wall shelter on the shore of Lake Alta. Bivvy rock to the true left of Lake Alta outlet.
Optional side-trips from Lake Alta with varying times & difficulty
(explored in more detail below, click on the titles to take you straight there):
1. The Remarkables lookout
2. Single Cone
4. Wye Creek
A family favourite
Ever since my parents moved to Arrowtown, Lake Alta has been a family favourite. It’s great as an after-dinner walk (in our long southern-latitude summer evenings). Or as a starting point for exciting day adventures. I only ever experienced the winter version of Lake Alta while growing up. We skied across it, barely registering that there was a lake under the snow. So it was incredible to hike up there for the first time in summer and see what a beautiful gem it is. The photos really don’t do it justice.
What makes this walk fantastic is that it’s so alpine, but so accessible. It’s great to escape the Central Otago summer heat, as the altitude really cools you off. We often take visitors up who have never been tramping before (as all of the climb to the ski field base buildings is done in the car). They too fall in love with the lake and the mountains. From Lake Alta there are more adventurous walks/climbs to explore that lead to amazing views.
How to get to Lake Alta
The Remarkables ski field is about a 45 minute drive from Queenstown. The road isn’t necessarily recommended for rental vehicles. It’s steep, has sheer drop-offs at points and the upper part is unsealed. But also in saying that it’s not a bad ski field access road compared with others in the area (TC I’m looking at you). Cars can make it up there without too much bother if you’re a confident and experienced driver.
Take SH6 out of Frankton, and cross the Kawarau (on the fancy (but still frustratingly-located) new bridge). Then keep an eye out for the turn-off to the Remarks on your left (about 3km after the bridge). The first part of the road is now sealed and much easier to drive than in the past. While the upper section is still gravel and often has potholes or corrugations (series of ruts that look like corrugated iron). If you haven’t driven on an unsealed road before, I wouldn’t recommend this as you first choice. But here and here are some helpful websites to get you up to speed.
The view from the road as you wind around the mountain is pretty beautiful in-and-of itself. There are some handy viewpoints to stop at. Drive up all the way until you reach the carpark at the end of the road, just below the ski field base buildings.
Lake Alta
The first part of the walk to Lake Alta follows the lower ski field roads, which, when they’re covered in metres of snow, make up the beginners slopes in winter. From the carpark, take the road to the right of the ski field buildings and follow it up. You’re heading to the top of the beginners chairlift; Alta Chair. This is directly behind the ski buildings from the carpark – not to be confused with Shadow Basin Chair, which will be to the right of the buildings). After about 5-10 minutes take the second right that you come to and start climbing straight up the hill, to the left of the chairlift. If you cross a concrete ford, you’ve missed the turn-off.
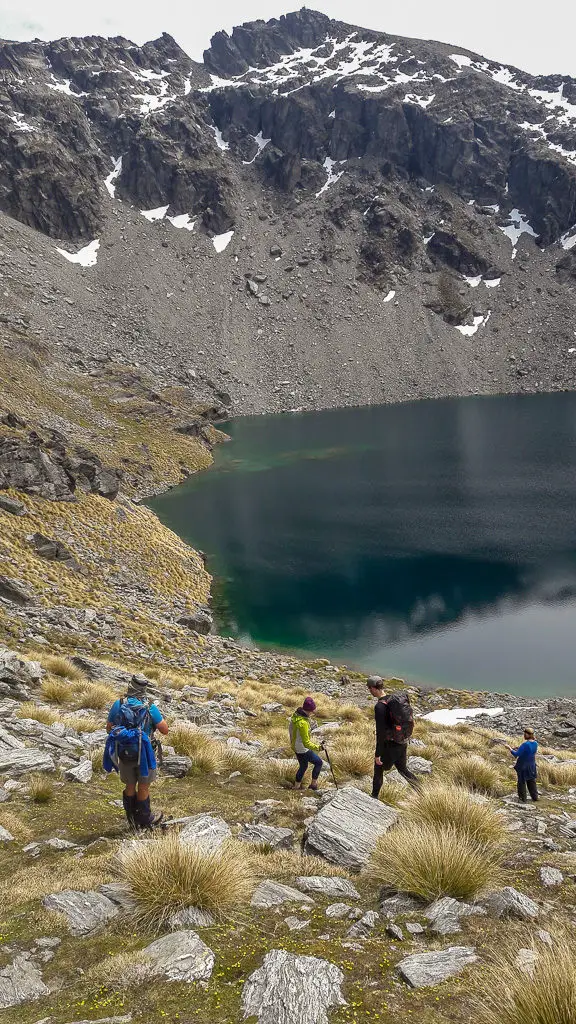
The steep road will eventually level out just below and behind the top of the chairlift. From here you’ll be following a marked route/track and leaving the ski field roads behind. Look for a cairn and a worn track heading up towards the lake, directly across from and slightly to the right of the road that you’ve come up on. This is roughly the halfway point and takes about 15-20 minutes to reach. The track curves around the small grassy basin with stepping stones over muddy patches and large flat rocks as bridges over the small outlet stream.


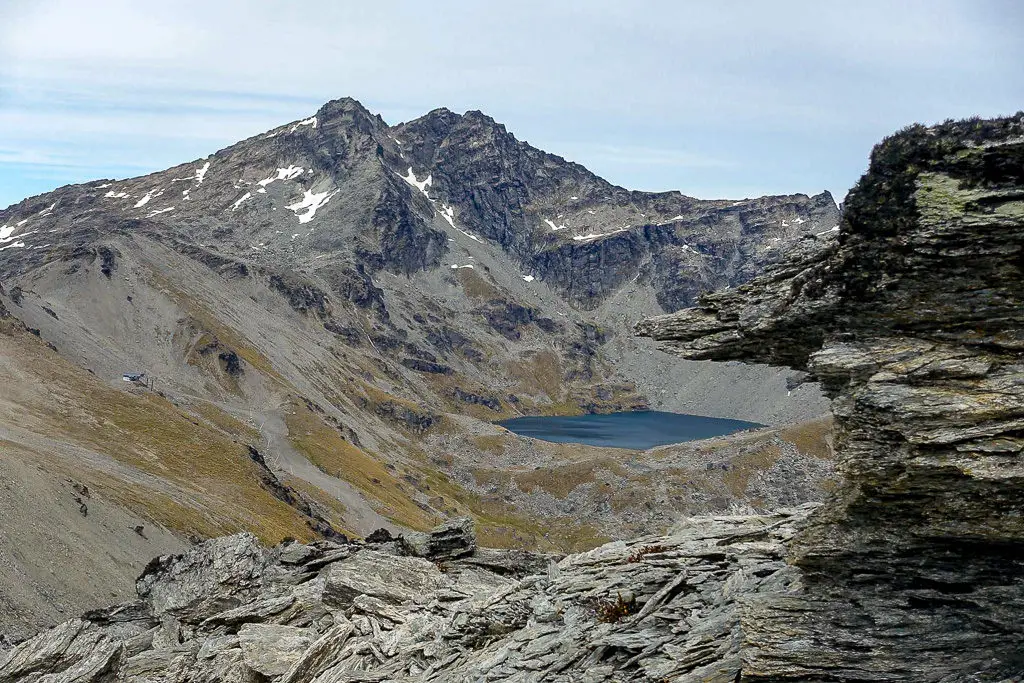
Once you’ve crossed the stream and the grassy flat, you’ll reach the foot of the last hill to climb. Zigzag up the hill for a little ways, before levelling out and getting your first glimpse of the lake. The outlet stream to your right was used as a scene from the Lord of the Rings movies. (Fun fact: Sean Bean, who played Boromir, refused to take the helicopter. He had to trudge up the very same track in his heavy costume. Although apparently he cheated and took the ski lift up part of the way.)
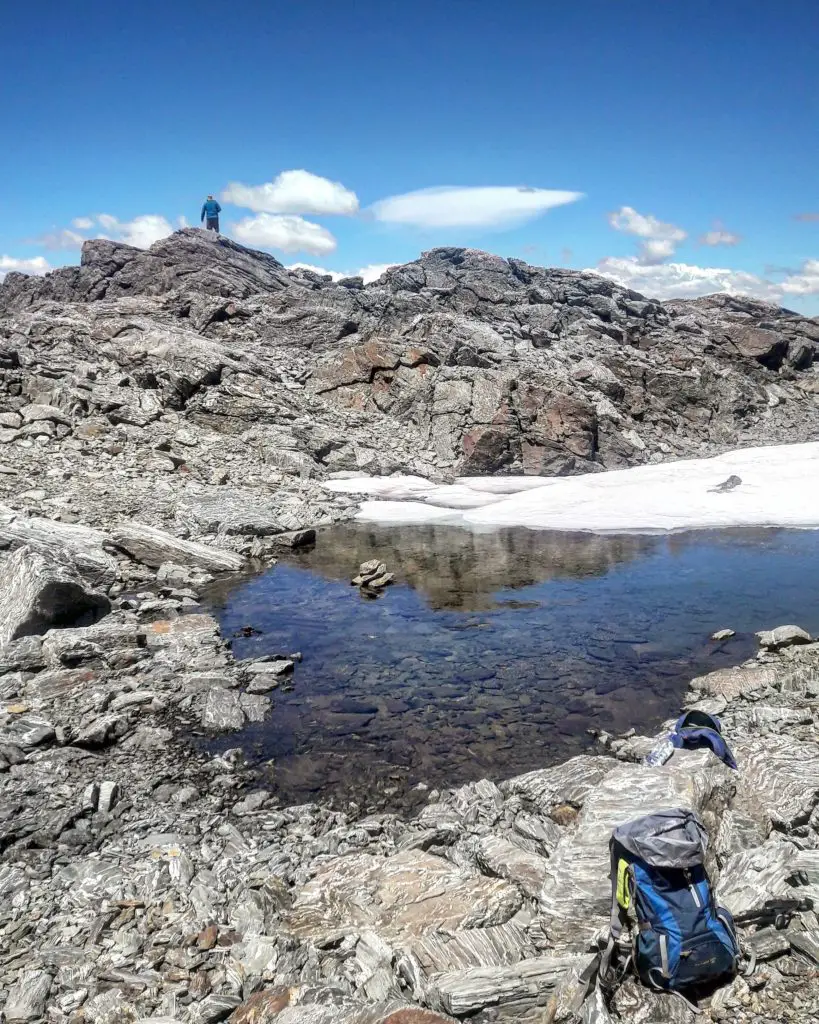
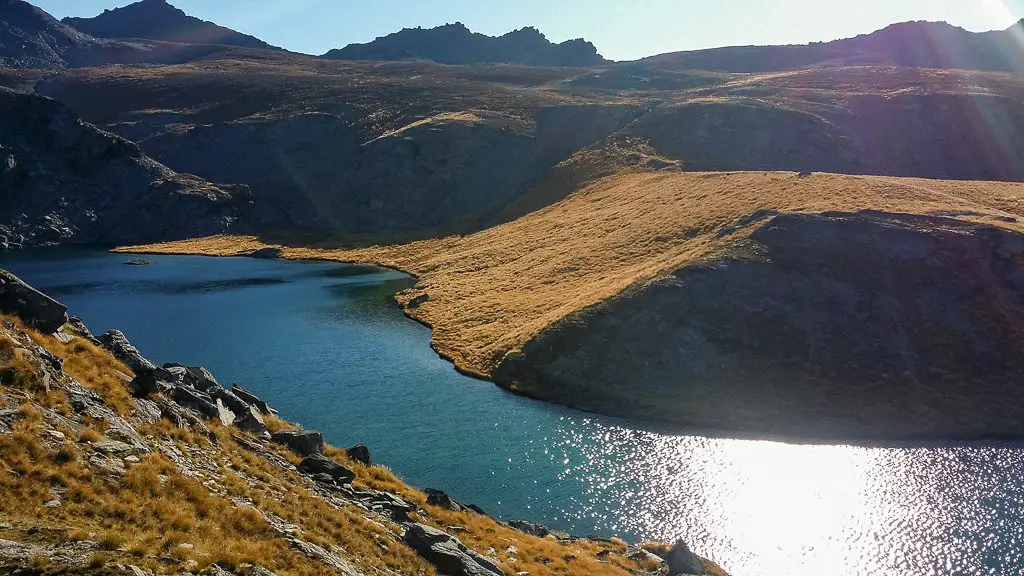
The lake is such a beautiful colour, especially on sunny summer days. One of the last times I went up there, we found a group taking turns exploring the lake with an inflatable paddle board that they’d carted up (sadly we had to leave before I could ask for a turn).
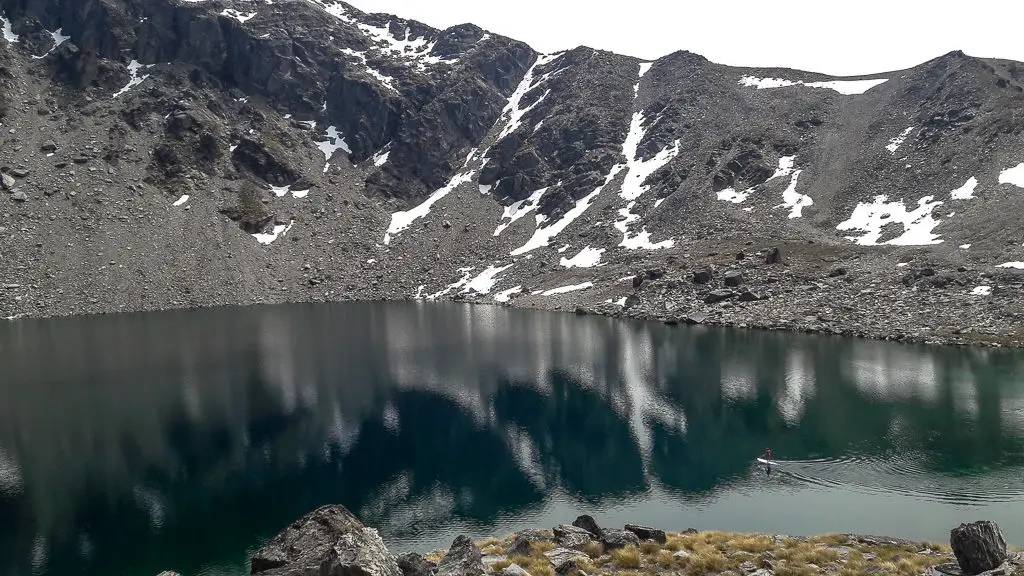
The lake is very cold, even in summer, so if you’re planning to go swimming you’ll also want to plan some warm and windproof clothing for afterwards. In addition, because you’re so high up (even if it doesn’t feel like you’ve climbed all that far), the air is a lot colder than down at Lake Wakatipu level. The weather can come in very quickly, so be cautious.
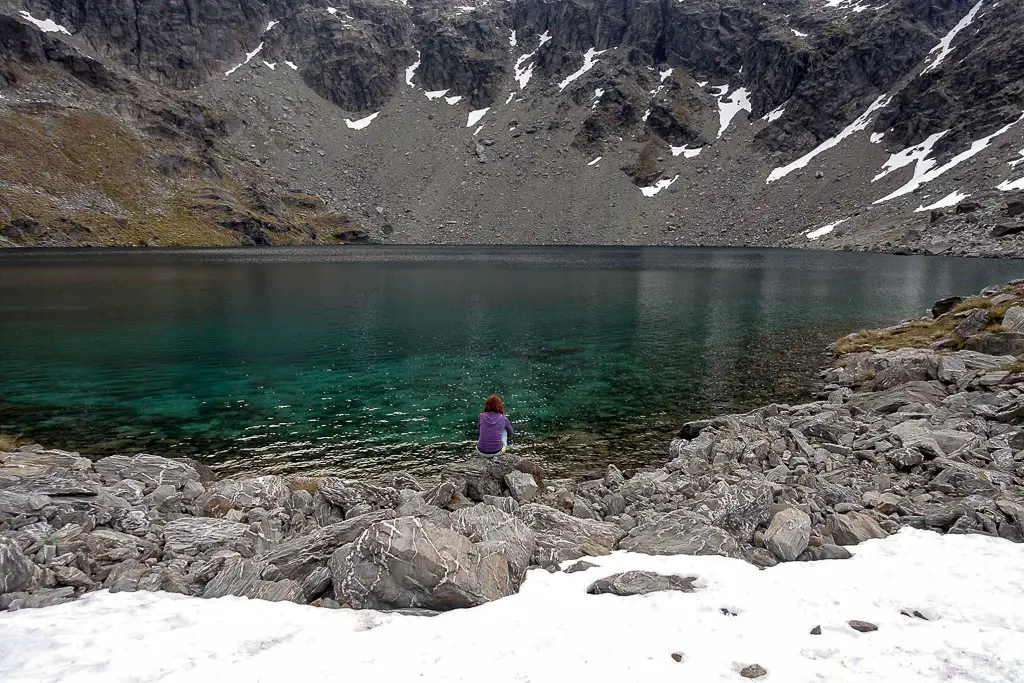
There is a rock wall on the shore to the left as you arrive that can provide some shelter if it’s windy, or just a nice spot for a picnic or rest. If you’ve come up just for Lake Alta, have a rest and then return back the same way. If you’re wanting to add something a bit more exciting to your day – then keep reading, there are some extra side trips starting from Lake Alta that you can do.
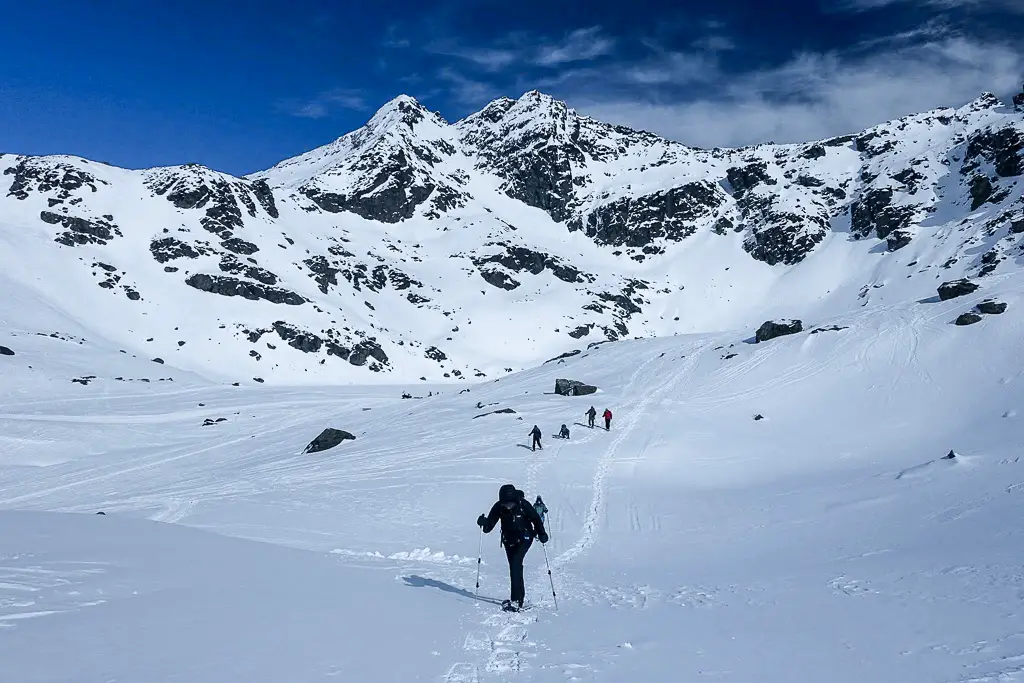
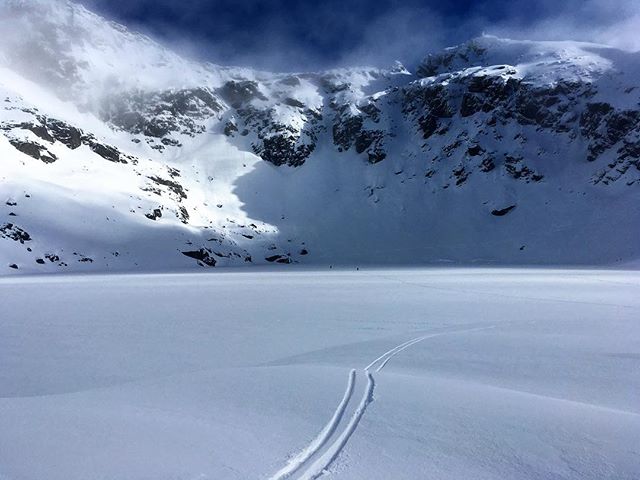
Lake Alta in winter:
1. Shadow Basin Lookout
(3-4hr return from carpark, medium difficulty)
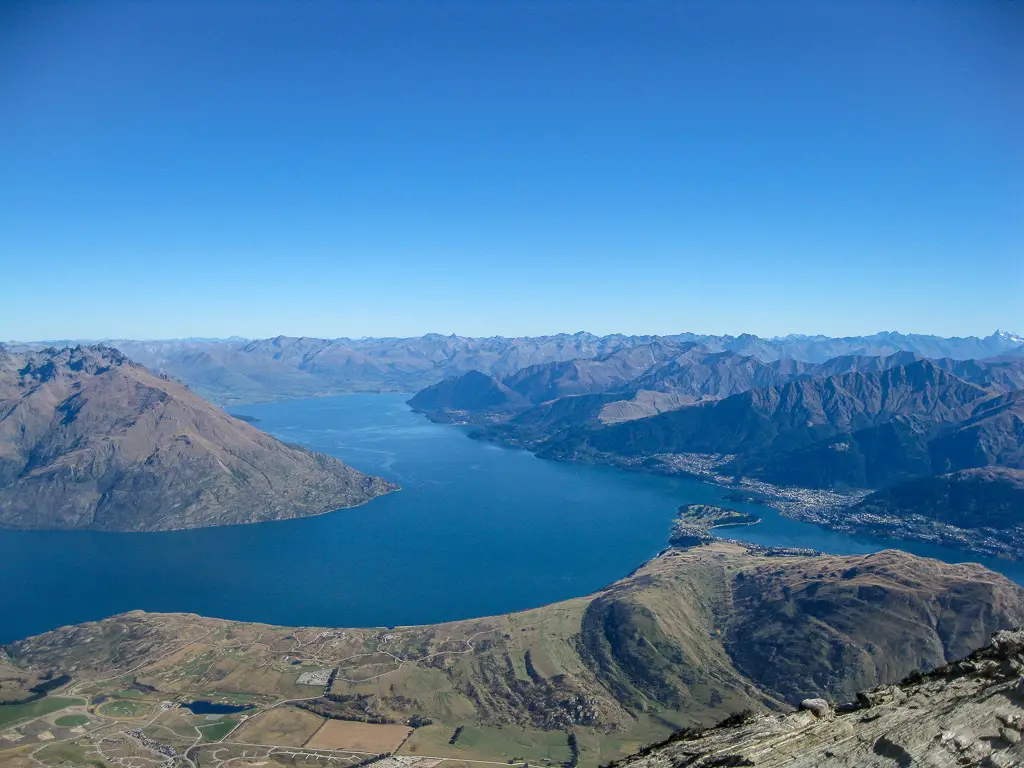
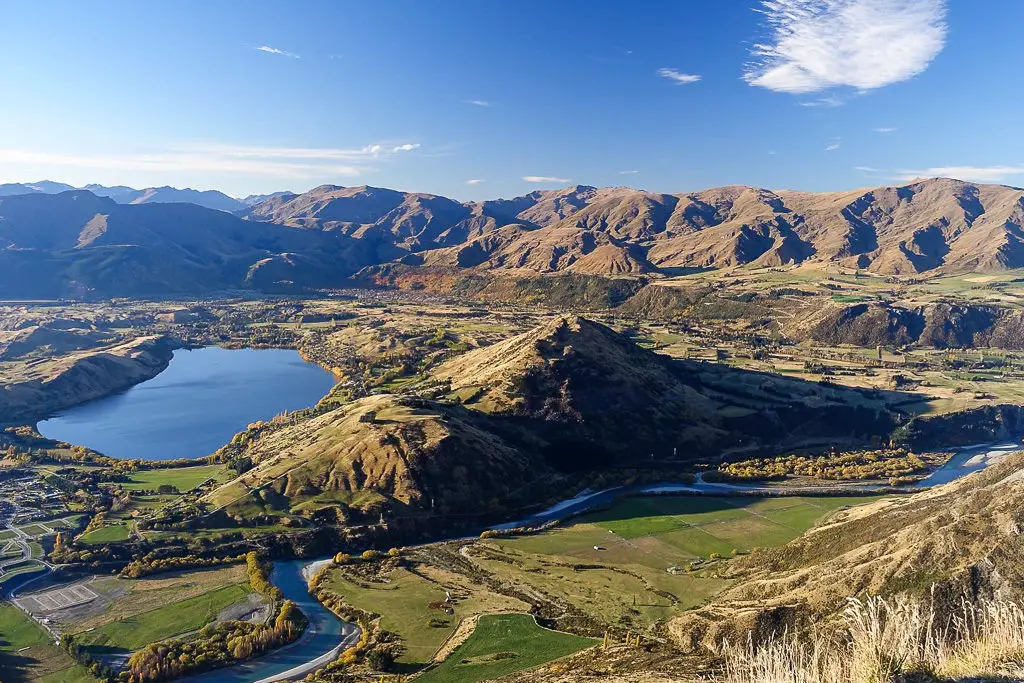
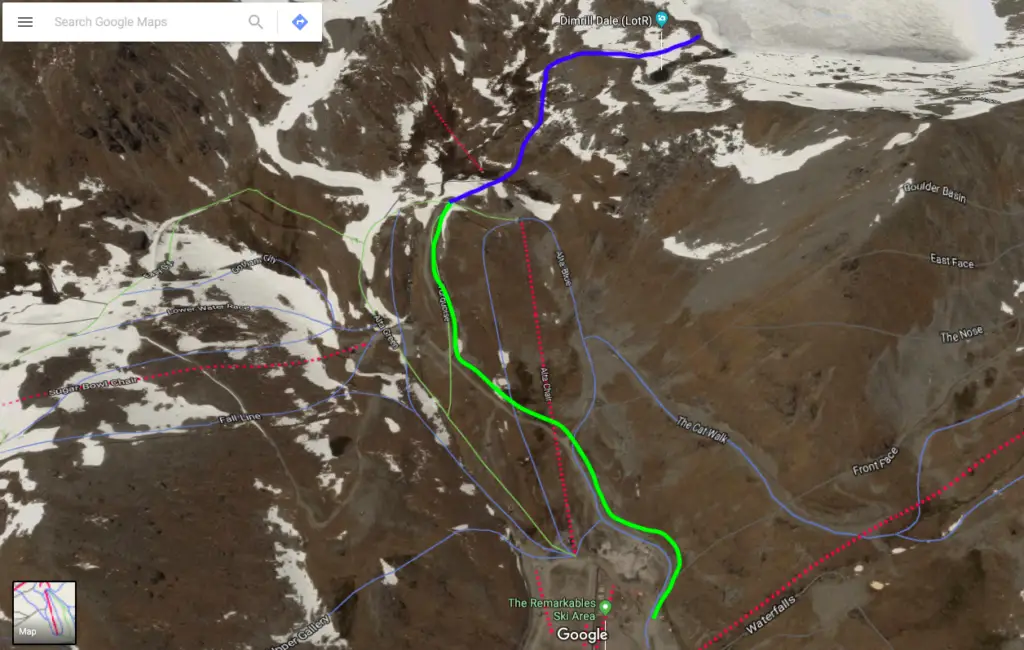
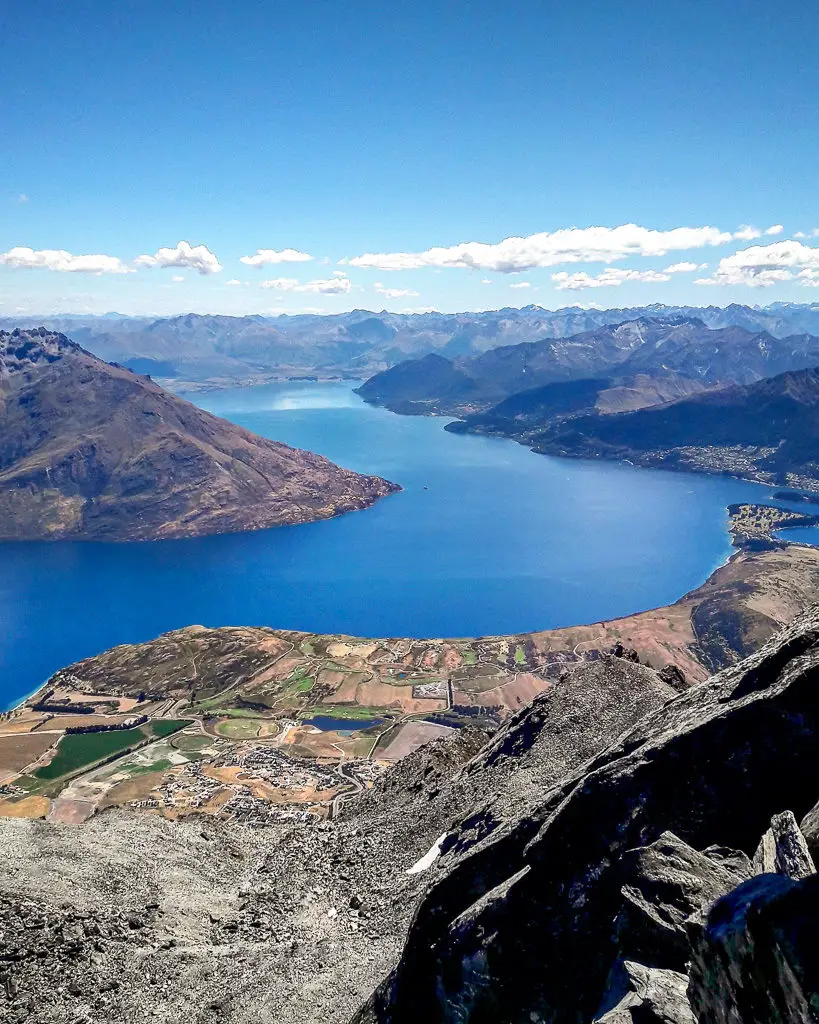
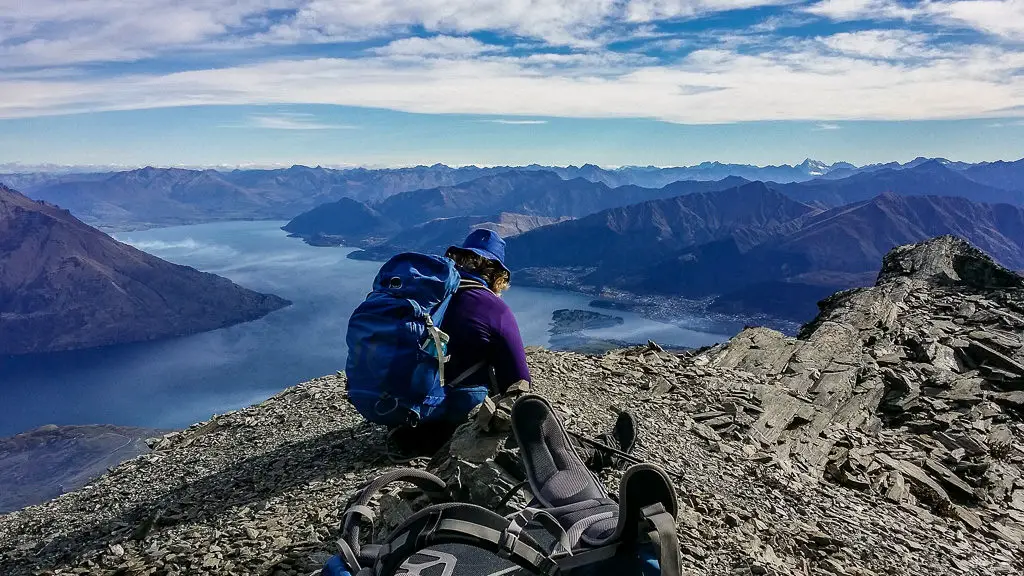
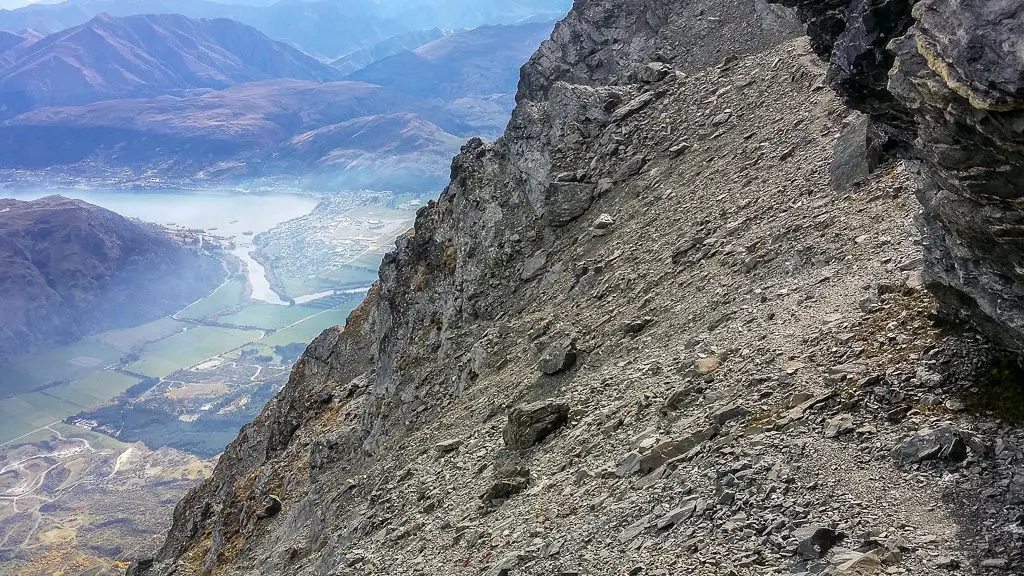
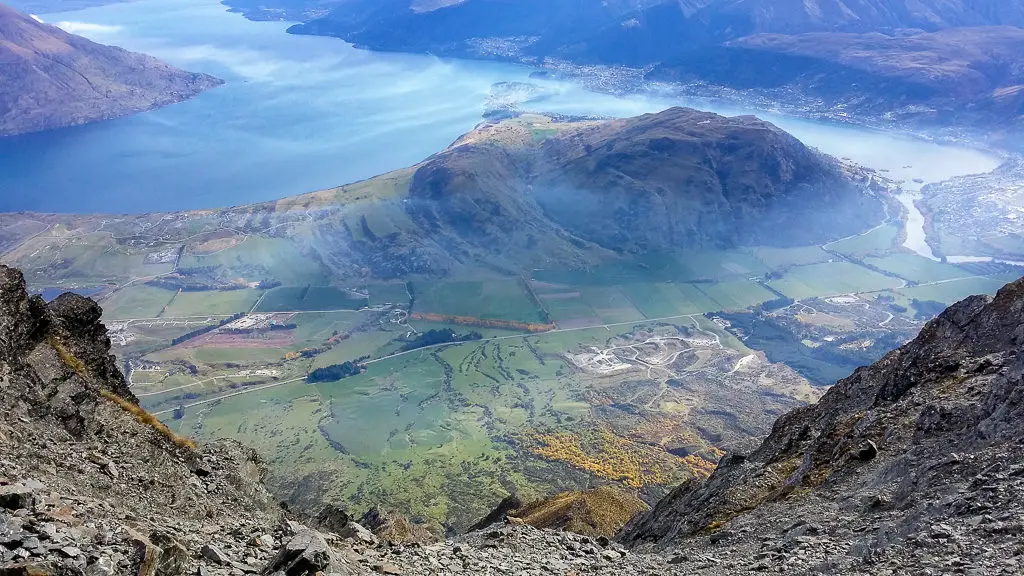
This is an amazing viewpoint overlooking Lake Wakatipu and Queenstown. It doesn’t take too much extra effort to reach (I say with the rose-tinted glasses of hindsight). The easy way up is to cut out Lake Alta and just go up the ski roads from the carpark and back down the same way (shown by the purple line on the map below). This makes the trip a lot easier and shorter. If you want something a bit more adventurous and a round trip with Lake Alta as a stop, then that’s doable too!
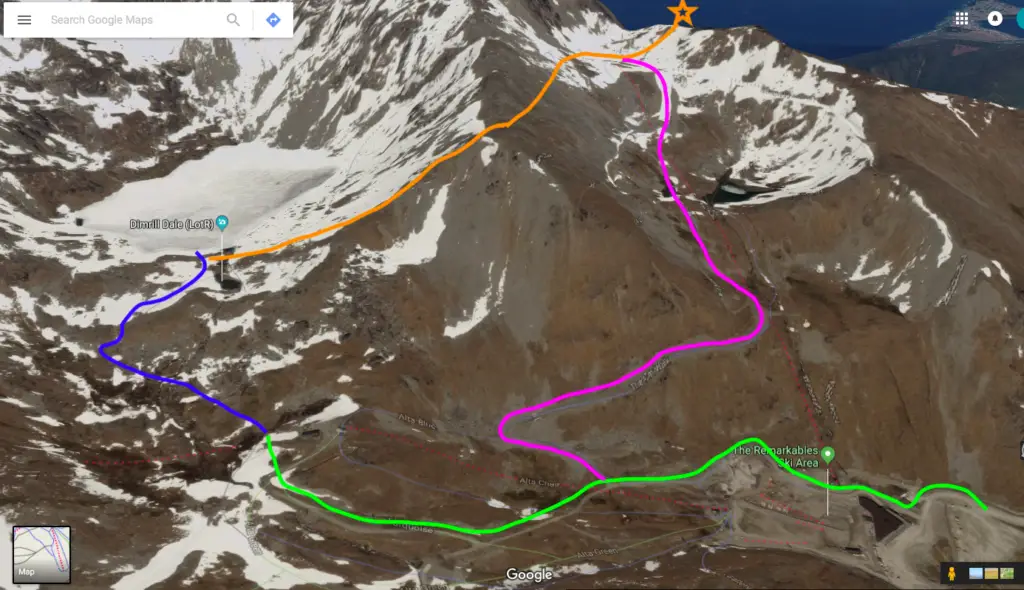
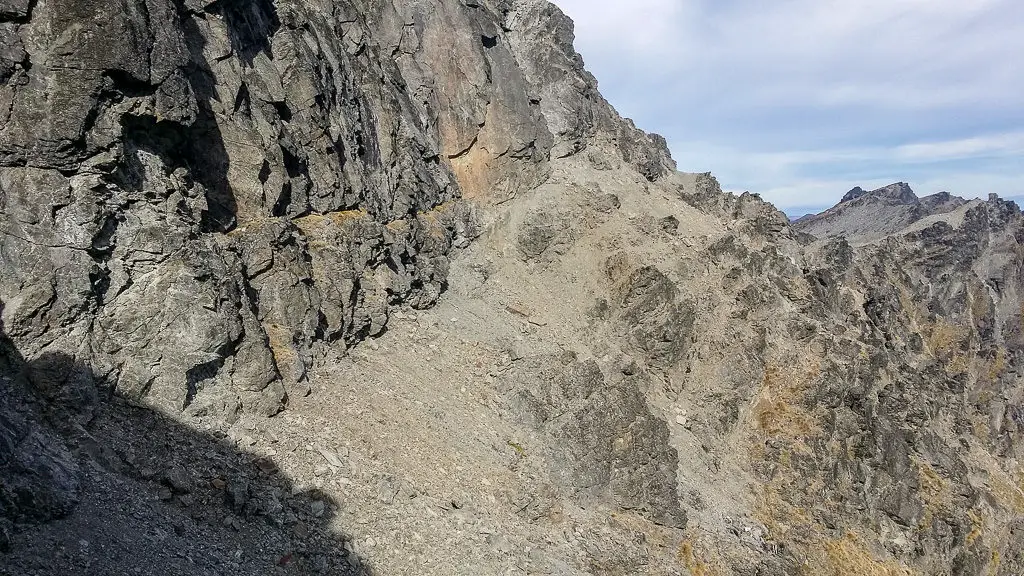
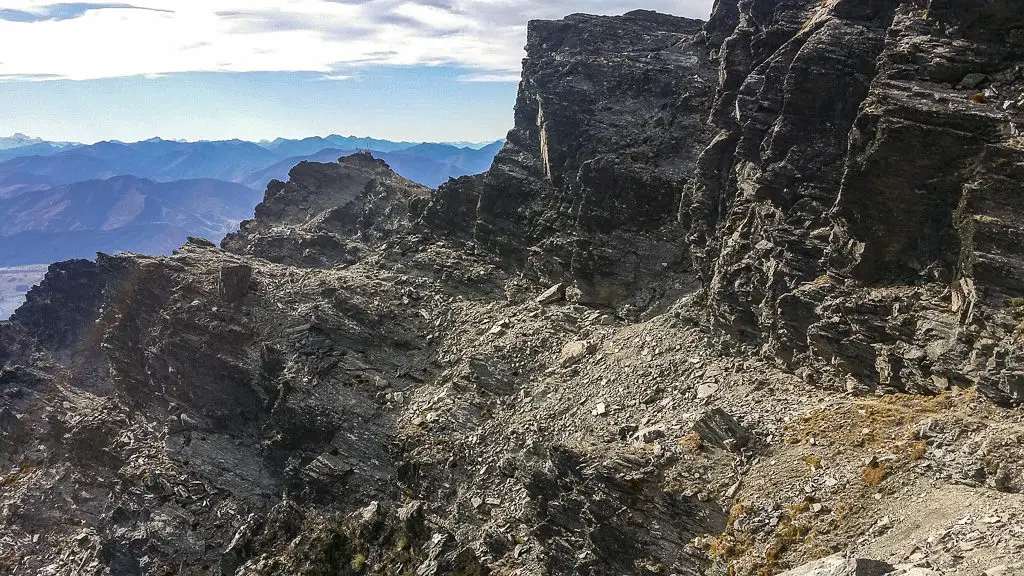
Head up to Lake Alta as per the previous directions (green and blue). Then instead of going back down, cross the outlet stream and head up the ridge (in orange on the map). This is a steep route with loose scree and drop-offs. So if you’re not comfortable with heights (or have children in your group), or the weather/conditions aren’t good, then this route would not be recommended.
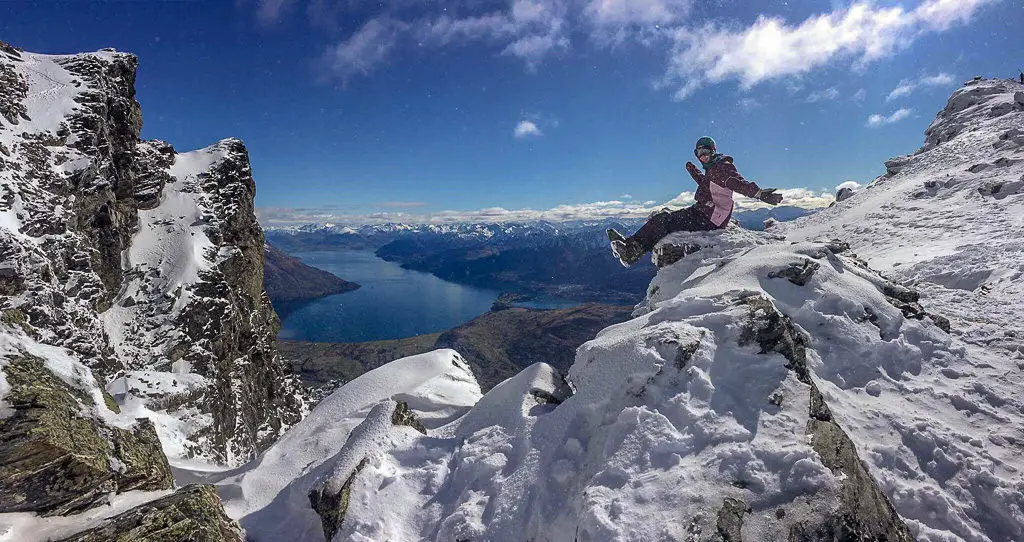
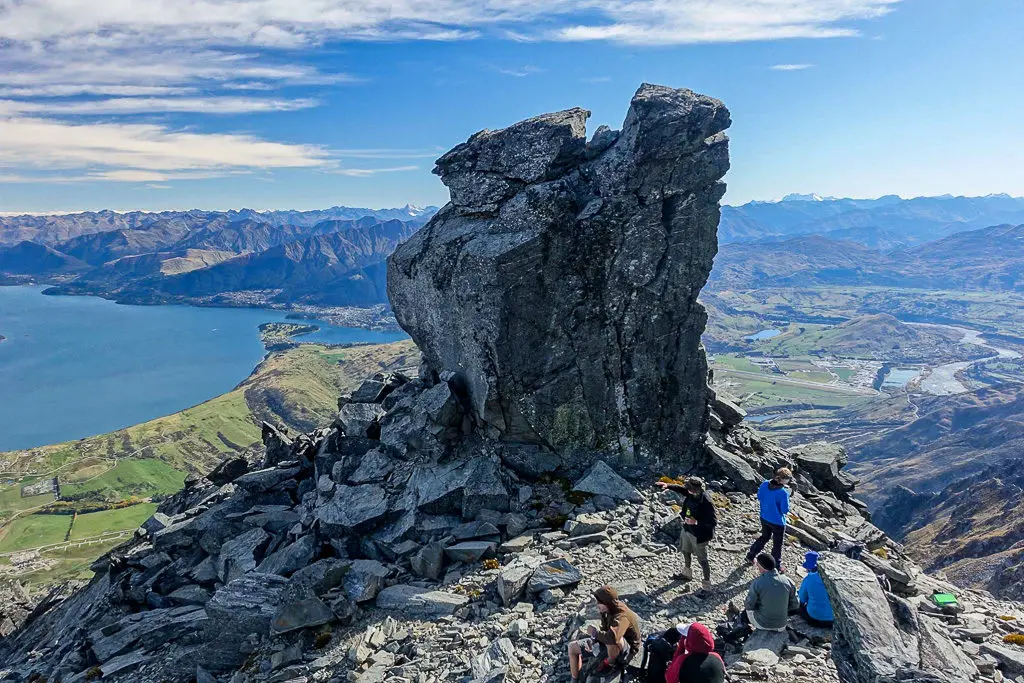
Once at the top of the ridge, sidle along the slope, heading towards the top of Shadow Basin chairlift. There is a route through the rocky slope that makes the going easier, but it doesn’t have markers. Keep an eye out, the route is easier to find when going this direction. Once at the top of the chair, look for the signpost for the Lookout and the rough track heading up to the skyline ridge. It’s about a 10 minute climb for awesome views!
In winter you can cheat and take the chairlift up from the carpark most of the way (if you have skis or a snowboard for the way back down), but the last climb to the Lookout is harder when snow covers the slope and can be a bit more treacherous (especially in ski boots).

The round trip is completed by either skiing/boarding down the slopes, or in summer walking down the ski field roads towards the base buildings (marked in purple on the map). The road is a much easier walk to finish on than the route across from Lake Alta.

2. Single Cone
(5-6 hr return from carpark including Lake Alta, very difficult)
Single Cone is the highest peak in the Remarkables range and requires technical experience and equipment (roped rock climbing in summer, snow/ice climbing with crampons & ice axe in winter) and/or an experienced guide to summit.
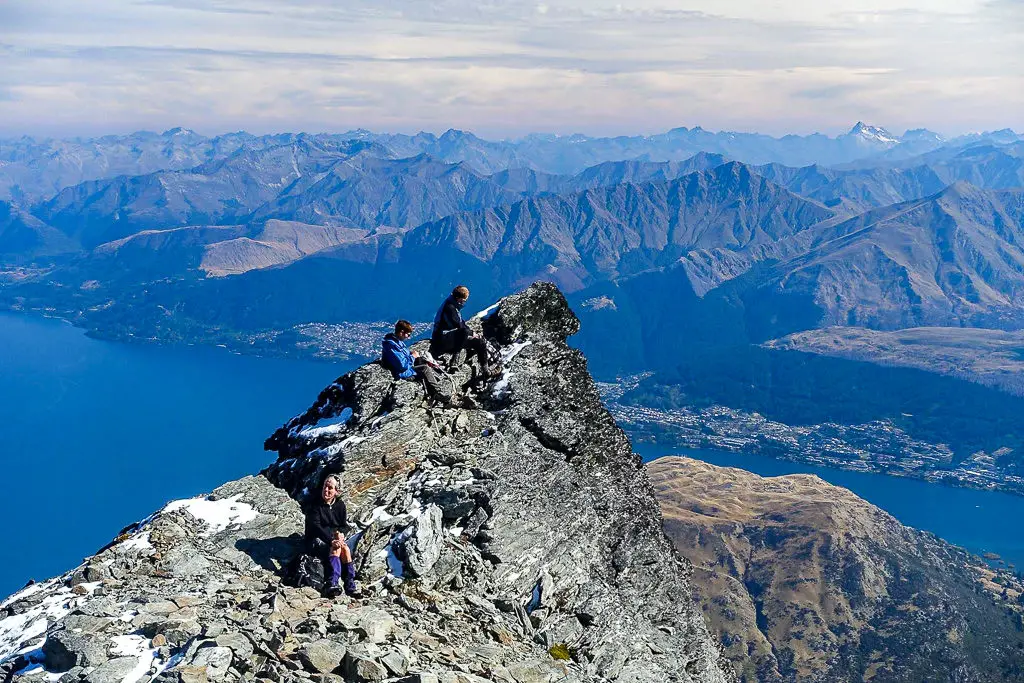
My Dad and I had neither the proper equipment nor a guide, and so didn’t make it to the summit, when we spontaneously turned a walk to Lake Alta into a climb up Single Cone (tramping insanity runs in my family apparently). The experience was still amazing despite the lack of summits and the views we gained were beautiful. Deciding to turn back before the top was also the safest thing to do, even if summit fever can make it a difficult one to make. We’re all logical people, but when that summit is within reaching distance it’s surprisingly easy to forget logic and, consequently, safety. Recognising that summiting Single Cone hadn’t been part of our plan for the day and therefore that we were under-prepared for the climb and might put ourselves into dangerous situations, meant that the only correct decision was to go no farther.
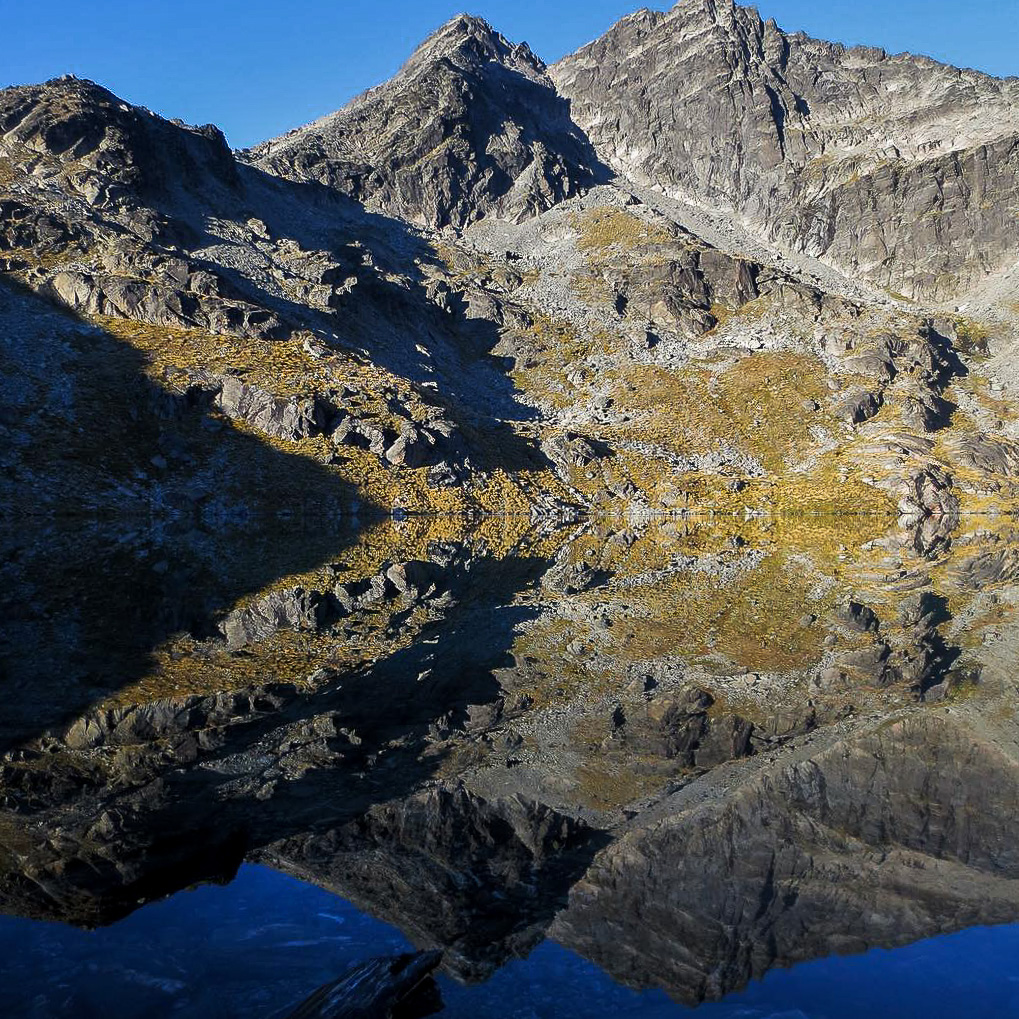
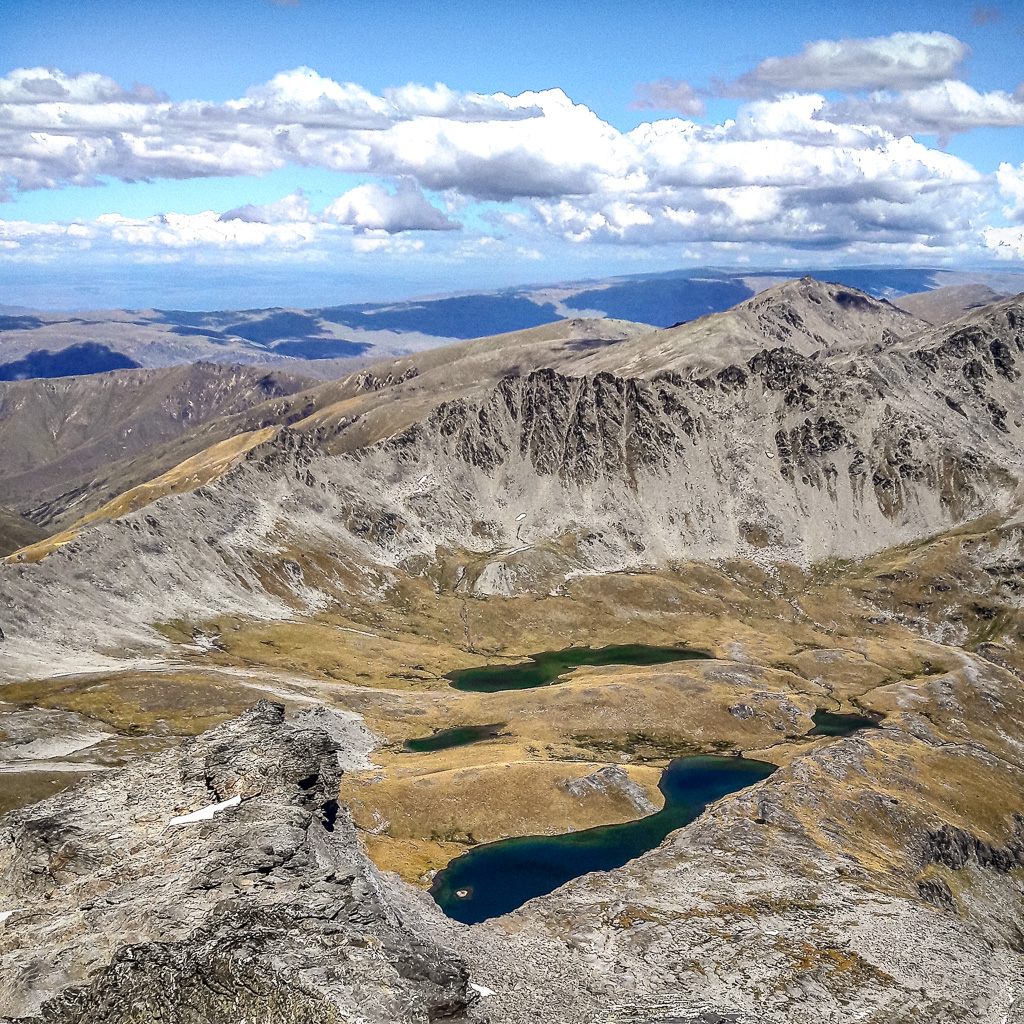
This trip was the first time I’d looked down into Wye Creek basin to get an almost bird’s eye view of its beautiful tarns – normally I’d be down at their level tramping through the tussocks. I felt really lucky seeing such a familiar spot from a different perspective.
And the views over Wakitipu once we gained the leading ridge up to Single Cone were amazing too – we were lucky with amazing weather (the reason why we’d considered going above Lake Alta in the first place).
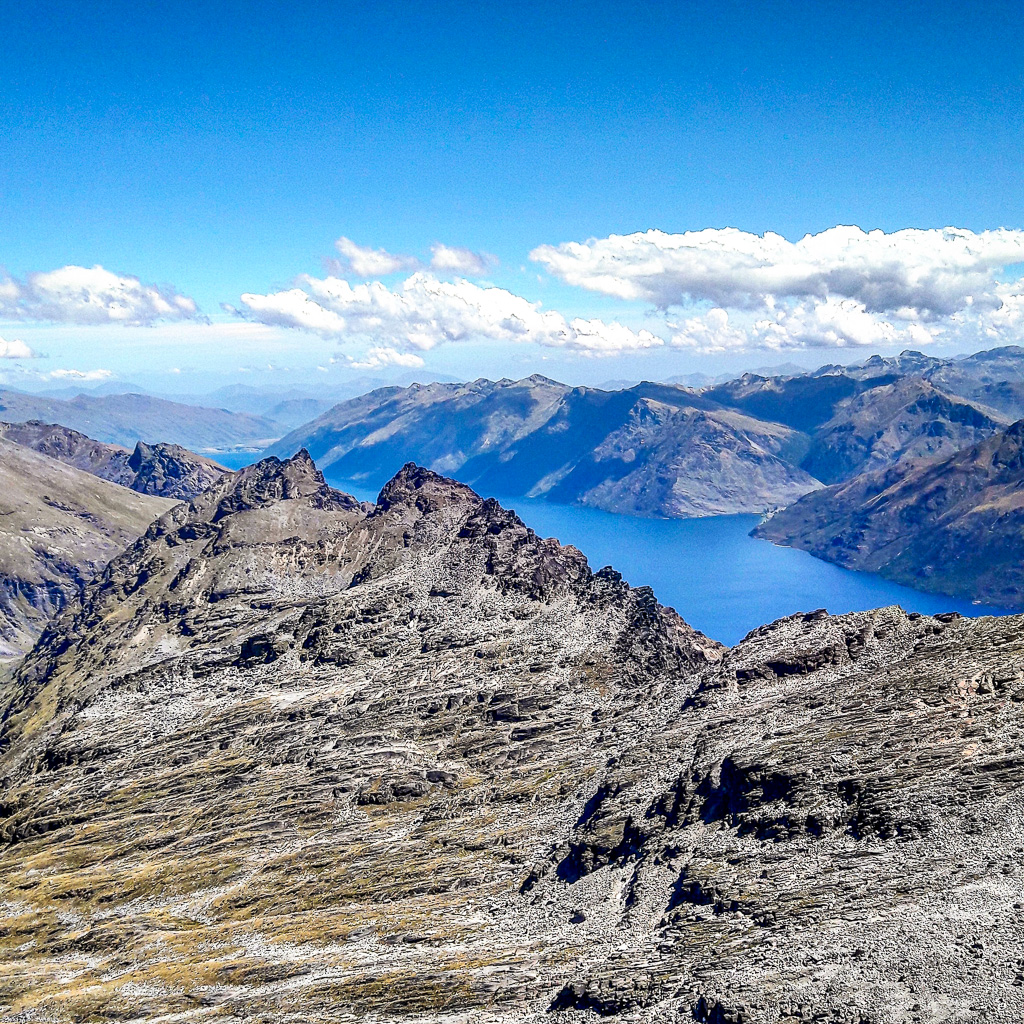
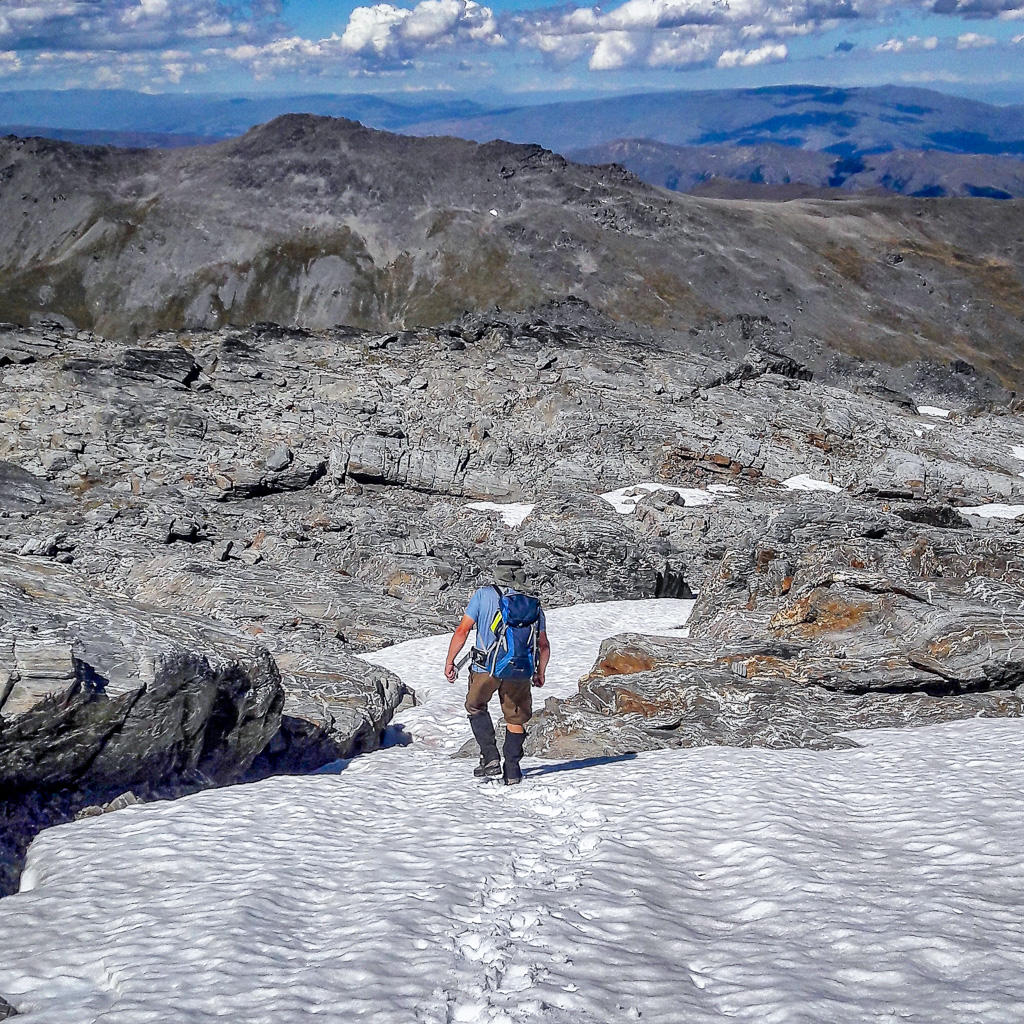
The route we took from Lake Alta was to climb to Wye Creek saddle, then head up the ridge to the right (facing Single Cone), before reaching a plateau of sorts with a boulder field. We walked along the Wye Creek side of this plateau (avoiding the boulder field, my least favourite things ever) following a rough route and found a small snow-melt tarn that we topped up our drink bottles from.
From the tarn we tracked out a bit of a route up the face and started the climb towards Single Cone in earnest, scrambling up rocks slabs and hoping we weren’t going to get bluffed out. In the end, we reached the ridge and the bottom of the south couloir – the final obstacle before the summit. This is where ropes and helmets are needed (as confirmed by guided climbers who abseiled/climbed down the couloir with the aforementioned equipment while we were taking in the views). This is despite Dad telling me how when he was 16, he’d told his parents that he and some friends were going to camp at Lake Alta for the night, and instead they climbed up Single Cone without using ropes, and it hadn’t seemed that bad – one of many stories where I question how my Dad survived his adolescence and early 20s.
We took a similar but slightly more straightforward route back down, and returned back to Lake Alta and then the carpark. We’d had cell service for parts of the way, and so were able to let Mum know about the change in our plans (and to revise our estimated arrival time for returning home) before the climb, and I could now tell her we were heading back down safely – she was a bit horrified that we’d even attempted Single Cone (she’d previously summited it as well, using ropes like a sane person), but happy that we’d turned back when needed.
I’d love to eventually tackle Single Cone properly (with a guide and proper gear) when I’m more prepared. There are companies based out of Queenstown like Queenstown Mountain Guides that offer guided trips, so when I’m fitter and back in the South Island I’ll have to give it a go!
3. Queen’s Drive
(6-8 hr looped return from carpark including Lake Alta and Wye Creek basin, extremely difficult)
Queen’s Drive is one of the most amazing trips I’ve been on, but also one of the most terrifying. It was kind of myth for a while, this route across the front face of Single and Double Cone, that my family had heard about for a long time but never knew the way despite looking several times. Once my parents moved to Arrowtown, they found someone who could show them the way, and Dad has subsequently guided several trips along the route.
Queen’s Drive runs across the west face of the Remarks (the impressive side you can see from Queenstown) and is more of a goat track on loose rocks about 2,000m up with sheer drops. The night after completing the trip I had continuous jolting awake dreams of falling from it. All this to say, do not attempt this lightly! I will not be describing the route, as this type of terrain really shouldn’t be readily accessible to everyone and their dog (especially as dogs aren’t allowed up the Remarks!), but I wanted to acknowledge that this route is there so that you can contact me if you have any questions or are looking at doing it yourselves.
I would definitely not recommend doing this unless you were experienced, with someone who had completed the round trip before (as there are many areas in which you could lose your way) and with at least three people (in case someone falls and one member of the party has to stay with the injured person, while the other goes for help). Alpine conditions (altitude, snow, ice, low cloud or fog, etc.) can make this route impassable even in the height of summer.
It is an absolutely amazing trip though, so if you are experienced and wanting to find out more information, please don’t hesitate to get in touch – the more information about these types of trips the better!
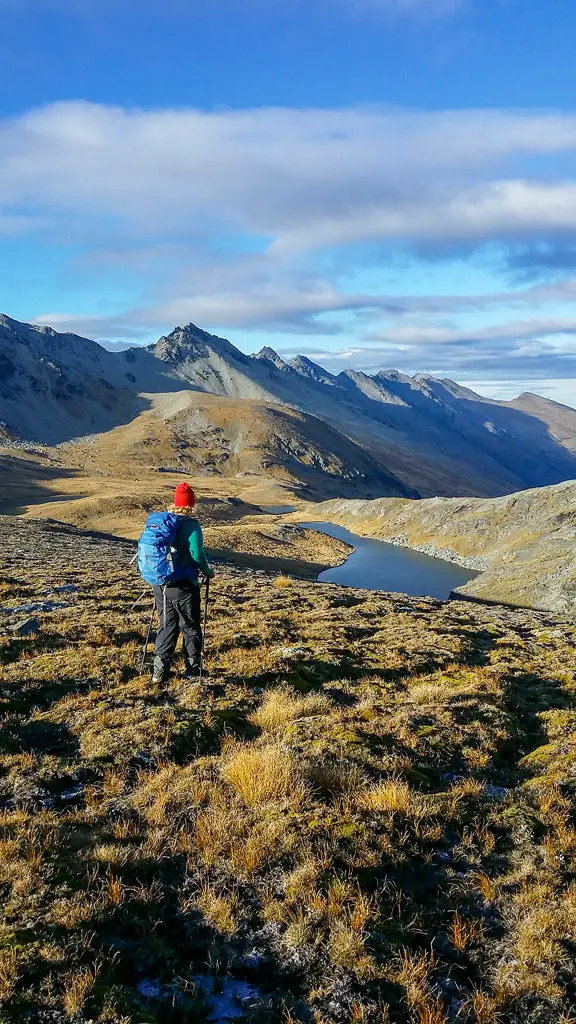
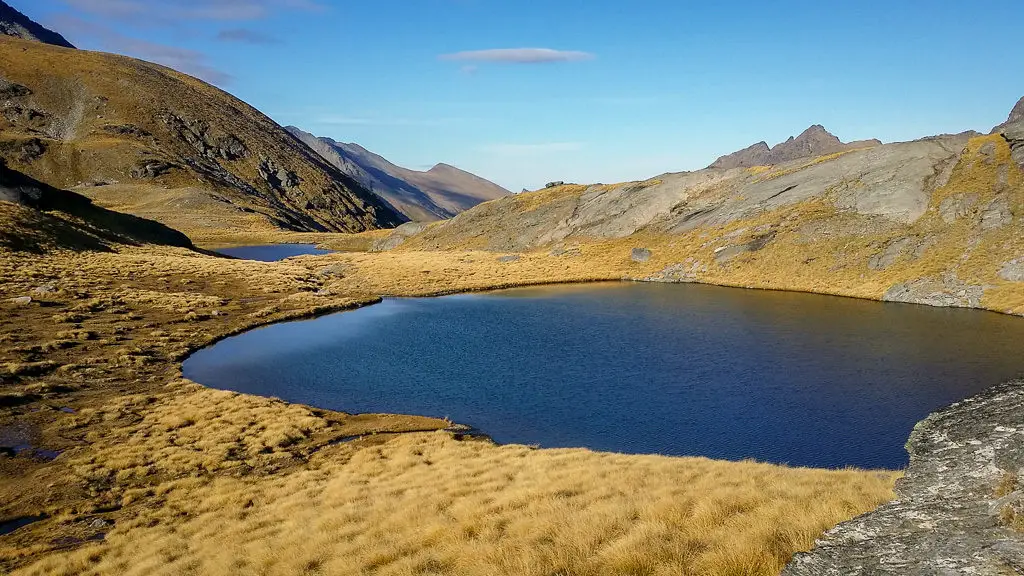
4. Wye Creek
(4 hr return exploring the basin or 8 hr one-way route out to SH6, difficult)
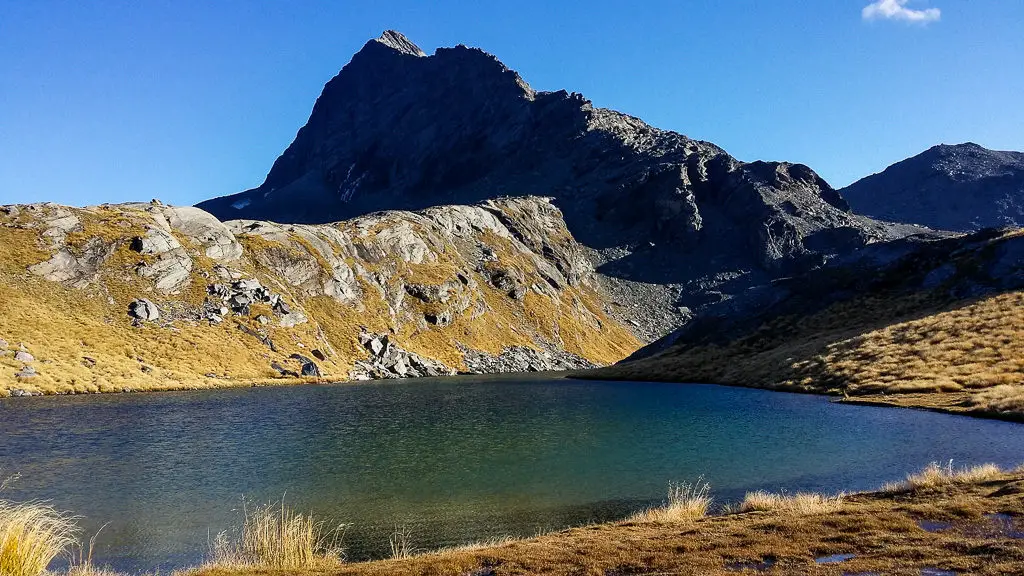
The trip around Wye Creek basin is hands down my favourite trip from Lake Alta (and a lot less intense than the others I’ve mentioned!). It deserves its own blog post, which will follow shortly!
In the meantime, here are some photos to whet your palate …
Safety
As always, please stay safe when you’re out exploring. Follow the Outdoor Safety Code:
- Choose the right trip for you (read my article on tramping safety, talk to DOC)
- Understand the weather (if it’s going to be really windy or stormy, this is not the track to do)
- Pack warm clothes and extra food (including windproof clothing, regardless of how calm or warm it is down in Queenstown. Check out my post here about what gear you need to take)
- Share your plans and take ways to get help (have an emergency beacon on your person)
- Take care of yourself and each other
These are recommended as summer-only trips and are in an alpine environment. If you’re not feeling super confident then you can always get in touch with me here on the blog or on my Instagram. Or take a look at my Tramping 101 series which includes this post about how to stay safe in the outdoors.
Also don’t be a dick, check out my guide to New Zealand tramping etiquette.
Stay safe and get outside!